Hello followers....
This site has moved to www.curiositycornerblog.blogspot.com
Please follow me at the new site!!
xoxo,
Jade
Recent Posts
Tuesday, April 12, 2011
Tuesday, June 15, 2010
I'M BACK!!!

My "In a funk" phase is completely behind me and I am back from my hectic hiatus. The house has officially sold and we are settled into our new home.
Some updates on the home situation......
While we had been under contract on a new home we were building for about 6 months we decided to back out, live like college kiddos again and begin to save for land in the Texas Hill Country. So, that we did. Well, not exactly.
Heres the deal..... My little brother goes to school in Austin (an hour away from our parents home in Johnson City) so he can take advantage of a magnet school education. My mother had been renting an apartment in Austin for the past 3 years while my brother could go to school here and driving back to Johnson City every day to work. My father stayed at the ranch and they were officially dating again! :) My mother made a deal with the Mr. Fashionista and I that we could not refuse. If we housed my little brother for the last year of his high school education she would pay the rent. Talk about the opportunity to save some major cash!!! So, we jumped right on the opportunity thinking we would never be able to save such an amount of cash in such a short time again.
So, the three of us are cozy as can be in our 3 bedroom apartment located in South Austin and I am having a ball decorating and making it feel like home again. Home ownership is wonderful, but I must say the simplicity of being a renter is just as nice.
Anywho, I am back in full force with lots of great posts coming your way!
XOXO,
Dudette
Monday, May 24, 2010
In a Funk

Sorry for being in a funk lately, but I have decided to take a little blog vacation. The house has sold and I am knee deep in boxes! Bittersweet endings…..
I’ll be back when life slows down a bit.
XOXO,
Jade
Wednesday, May 5, 2010
I spy...
I love when I spy IKEA furniture in beautiful, well designed spaces. Sure, a lot of IKEA's furniture belongs in post-college grad apartments, but many of their items are worthy of beautiful, designer rooms.
Here are a collection of designer images with IKEA furniture to get you inspired...
Here are a collection of designer images with IKEA furniture to get you inspired...
I spy: IKEA KARLSTAD sofa & chairs

I spy: IKEA MALM dressers
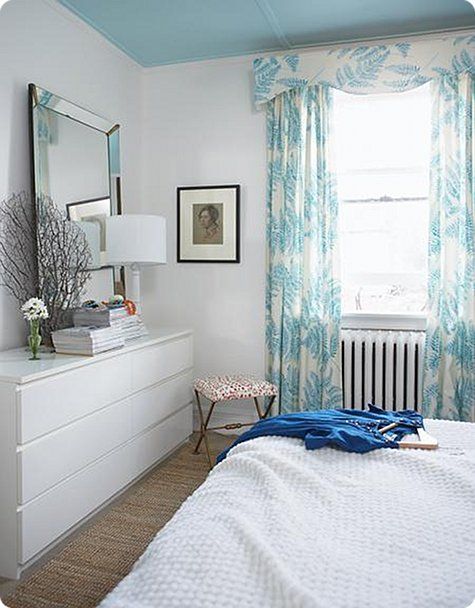
{beautiful picture from design*sponge}
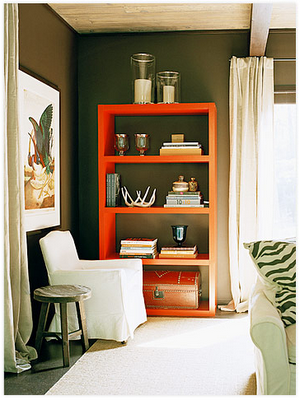
I spy: IKEA EXPEDIT & LACK

{by my girl Jamie Meares of Furbish Design}
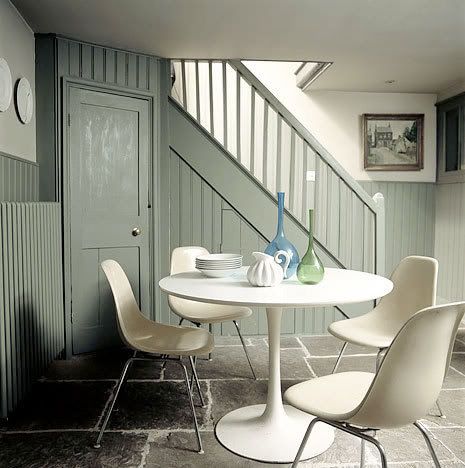
I spy: IKEA DOCKSTA table
I spy: IKEA LACK bookcase
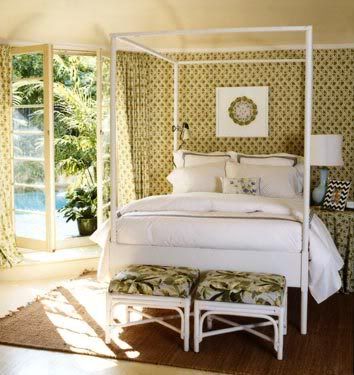
I spy: IKEA EDLAND bed
I spy: IKEA MALM dressers
{beautiful picture from design*sponge}
I spy: IKEA EXPEDIT & LACK
{by my girl Jamie Meares of Furbish Design}
I spy: IKEA DOCKSTA table
I spy: IKEA LACK bookcase
I spy: IKEA EDLAND bed
Tuesday, May 4, 2010
Dream Land
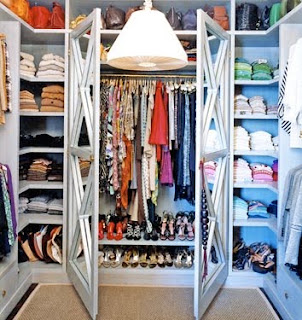
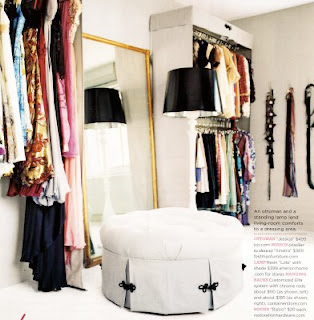
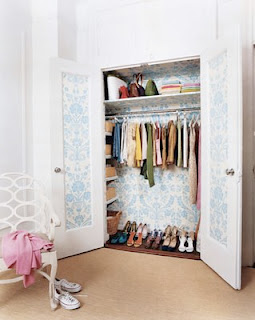
Excuse me while I drift onto dreamland for a bit. I stumbled upon these amazing closets and haven't been able to stop thinking about them since.
I must admit, I am a lucky girl with a closet most girls would be jealous of (ah, the organization). But these closets are just down right B-E-A-UTIFUL!
Take a look.....


I must admit, I am a lucky girl with a closet most girls would be jealous of (ah, the organization). But these closets are just down right B-E-A-UTIFUL!
Take a look.....


Thursday, April 29, 2010
Another DIY headboard
For some time, I'd had my eye on the Modern Velvet Headboard ($280) from Urban Outfitters, but I simply couldn't bring myself to spend $315, including shipping, on the thing. I'm not quite pleased with the quality of UO's materials (particularly the velvet they use), and since the headboard would be mostly just a decorative piece, it didn't seem like a sensible purchase. So what's a girl to do? DIY it of course!

It didn't seem like it would be a difficult project, and building my nailhead trim headboard myself would allow me to choose exactly the fabric I wanted, in addition to saving a bundle. So off to Home Depot and the fabric store I went! I picked a greenish gray German velvet to bring some contrast to my light bedding.
Here's are the supplies you'll need:
- Piece of 1/2-inch plywood cut to the width of your bed frame and desired height (54"w for full, 60"w queen, 34"h). $17
- 1/2-inch foam to cover surface area of one side of the plywood (i.e. 54" x 34", etc).$2.50
- 3 yards of 54" batting. A queen-size bag will do. $11
- Staple gun and staples. Borrowed
- 2-3 yards of fabric. (I bought 3 yds. and have some to spare, so 2 yds. will probably do.)$24
- French Natural Nailhead Trim — available at Joann's Fabrics, eBay seller nails-to-you($8.50), DIY Upholstery Supply ($15). $8.50
- Hammer or rubber mallet. Owned
Total Cost: $63!
Now, onto the steps . . .
- Head to Home Depot and have them cut your piece of plywood to size. They'll do it for free. If you want to screw your headboard directly into your bed, rather than hang it from the wall, you may want to have them cut you legs from the scrap plywood.
- Lay your plywood on the floor. Lay the foam on top of the plywood and staple it down, just in the four corners. If it's not a perfect shape, you may need to cut smaller pieces from the roll of foam and arrange them to fit.
- Unroll your batting and stretch it out flat across the floor. If it's already folded in two layers, leave it like that, you'll want two layers. Center the plywood, foam side down, on top of the batting, making sure there's room to fold the batting onto the backside of the plywood.
- Begin stapling the batting to the back side of the plywood, pulling it tautly as you go. When you reach the corners, fold them nicely like you would a present. Continue all the way around.
- Make sure your fabric is ironed or steamed if it has wrinkles.
- Lay your fabric on the floor, front side down. Lay the plywood down on top of it, foam/batting side down, with at least two or three inches of fabric around the edges of the plywood all the way around. Cut off excess fabric if needed.
- Begin stapling your fabric to the backside of the plywood, pulling it tautly as you go. When you reach the corners, be extra careful to fold them neatly like a present.
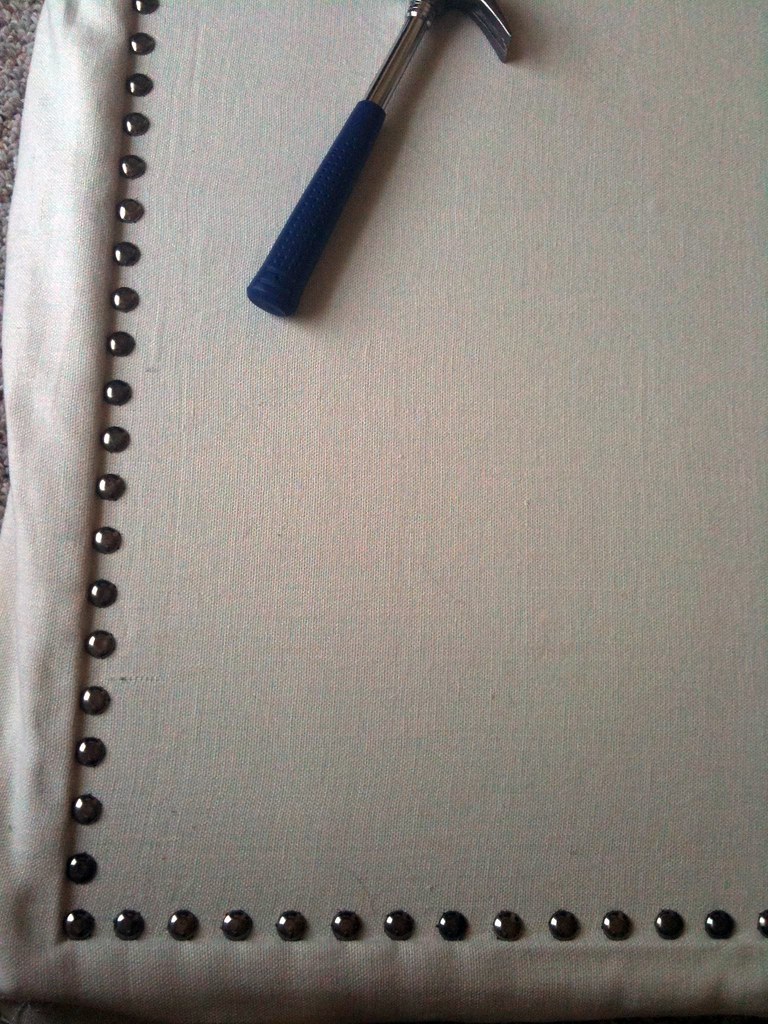
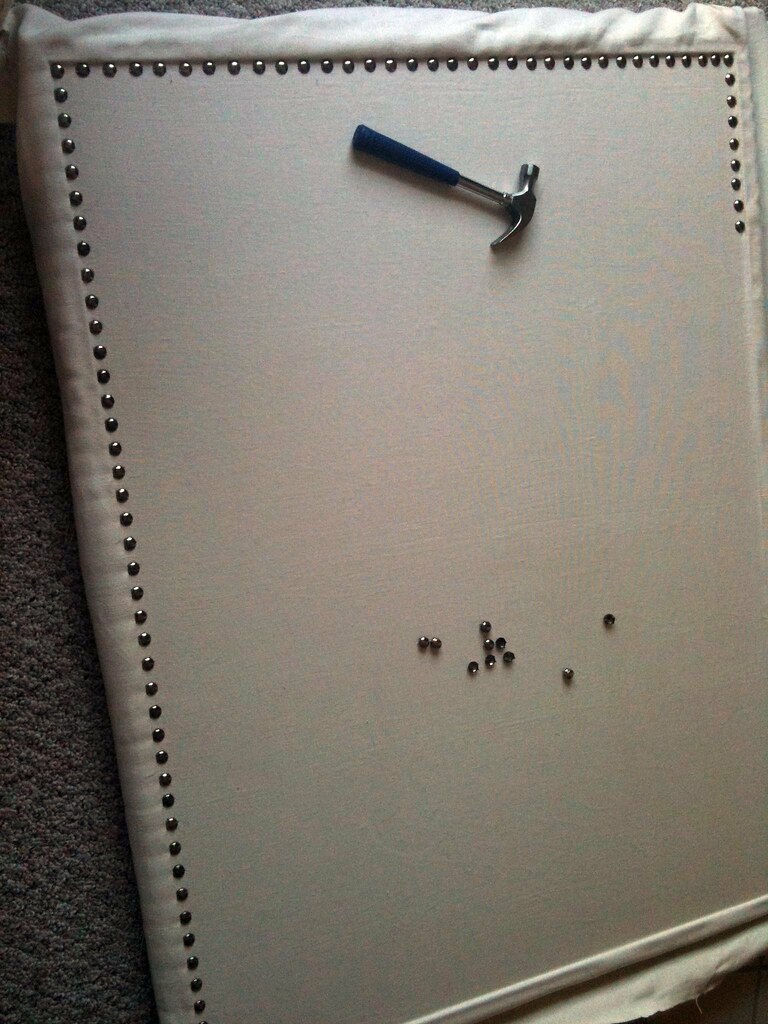
- Next up: the nailhead trim! The nailhead trim is basically a strip of nailhead that you only have to nail in every fifth nail. This saves a lot of time and makes lining up the nails a cinch. Decide what pattern you're going to go with ahead of time. I chose two rows of trim, but you could easily go with one, or even get more complicated. I wrapped my hammer in a sock so it wouldn't scratch the nailhead, but a rubber mallet will also work.
- Start at the bottom and begin nailing in the trim, checking to make sure it's a straight line as you go. When you get the corners, you may have to snip off some of the trim, and hammer in real nailheads depending on the length and width you're going for. Repeat as necessary until you've completed the trim.
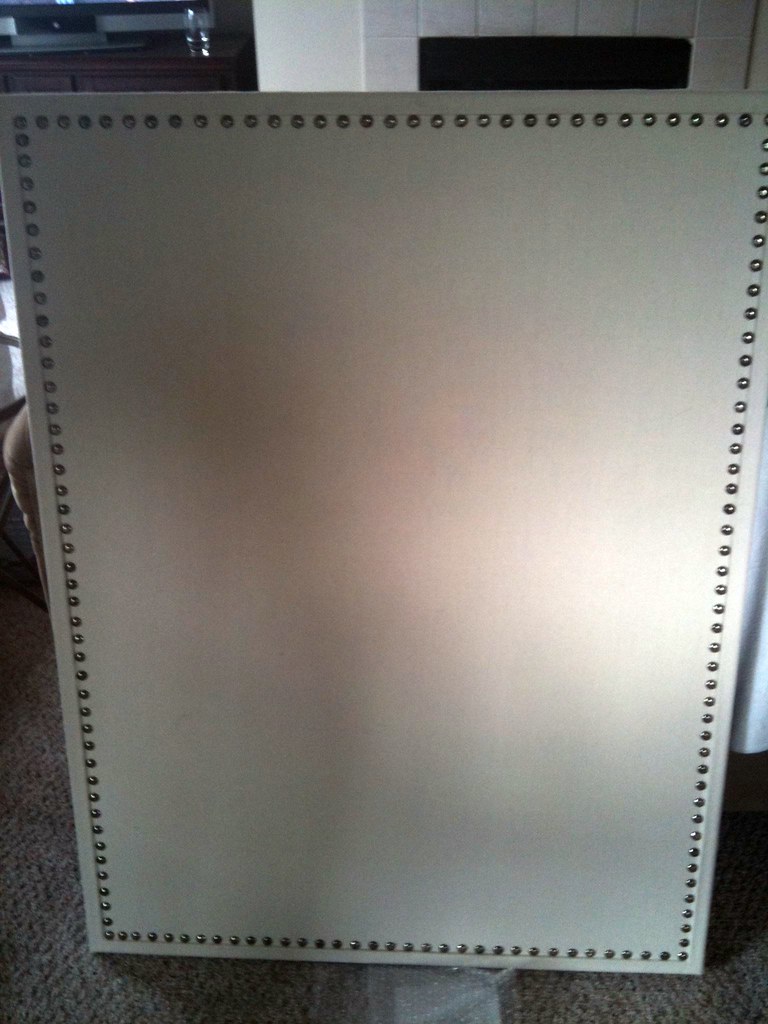
- Fini! If you're going to hang your headboard, I'd recommend screwing in two heavy duty D-ring picture hangers into the back of the headboard, and hanging them from a screw or hook on your wall. If you want to attach the headboard to your bed, you can screw plywood legs to the headboard and them bolt them to your bed frame.
Check out the entire project here.
Wednesday, April 28, 2010
DIY Classy Corkboard
Loved this DIY Corkboard that Bryn Alexandra recently posted. This will be a DIY in the new house.
One of my local clients and new friend Sarah asked me if I could do something similar to Erika's fabulous inspiration board:
And I said, sure I can!
The process was actually much simpler than I thought and it turned out really nice.
The materials involved are:
Corkboard (we used a 3' x 4' from Staples)
Fabric (we used ivory linen)
Nailheads (we used these)
Hammer
Spray Adhesive
Staple gun
Iron
Steps:
1. Iron your fabric like crazy to get all the wrinkles out (especially if using linen)
2. Spray adhesive the fabric onto the cork section of the board only, leaving the moulding trim unglued.
3. Nail in the nailheads with the hammer- I measured the width between the nailheads with the width of my pinkie finger. This was easy and assured that everything was even :) Go along the line of the board's moulding trim and you will get a straight line.
4. Spray adhesive the fabric onto the moulding
5. Staple gun the fabric onto the back of the board and you're done!
I didn't take pictures of the entire process.. I grabbed my iPhone mid-way through to snap a few pictures. I'm really bad about taking pictures for my DIY projects... I know, I need to work on that. Bad blogger!

[It never fails. When you have a black dog, there will always be black dog hair in my pictures.]
The finished product!
Yes, I am aware of the terrible picture quality. But I got a promise from Sarah to get pictures of it hung :) I'll be sure to share with you when I get them!
One of my local clients and new friend Sarah asked me if I could do something similar to Erika's fabulous inspiration board:
And I said, sure I can!
The process was actually much simpler than I thought and it turned out really nice.
The materials involved are:
Corkboard (we used a 3' x 4' from Staples)
Fabric (we used ivory linen)
Nailheads (we used these)
Hammer
Spray Adhesive
Staple gun
Iron
Steps:
1. Iron your fabric like crazy to get all the wrinkles out (especially if using linen)
2. Spray adhesive the fabric onto the cork section of the board only, leaving the moulding trim unglued.
3. Nail in the nailheads with the hammer- I measured the width between the nailheads with the width of my pinkie finger. This was easy and assured that everything was even :) Go along the line of the board's moulding trim and you will get a straight line.
4. Spray adhesive the fabric onto the moulding
5. Staple gun the fabric onto the back of the board and you're done!
I didn't take pictures of the entire process.. I grabbed my iPhone mid-way through to snap a few pictures. I'm really bad about taking pictures for my DIY projects... I know, I need to work on that. Bad blogger!
[It never fails. When you have a black dog, there will always be black dog hair in my pictures.]
The finished product!
Yes, I am aware of the terrible picture quality. But I got a promise from Sarah to get pictures of it hung :) I'll be sure to share with you when I get them!